Oh Yeah I Made These Skin Tone Swatches For Me To Use For Colouring Style Consistencies Sake But Hey

Oh yeah I made these skin tone swatches for me to use for colouring style consistencies sake but hey they might be useful to other people so I made them into one image and woo now y’all can use them lol
Probably aren’t perfect but hey they do the trick for me well enough :p
More Posts from Nastysynth and Others


Hi there! Hope you’re having an amazing day as well! :D Here are some tutorial sketches on how I approach drawing male and female characters, and Handsome Jack. I tend to focus on varied uses of curves and angles when drawing male or female characters. Hope this helps!
Things you can say in response to literally anything, when you have nothing else to say:
As the prophecy foretold.
But at what cost?
So let it be written; so let it be done.
So…it has come to this.
That’s just what he/she/they would’ve said.
Is this why fate brought us together?
And thus, I die.
…just like in my dream…
Be that as it may, still may it be as it may be.
There is no escape from destiny.
Wise words by wise men write wise deeds in wise pen.
In this economy?
…and then the wolves came.
Do you any tips about using ms paint?
I think I have few tips
#1Use 500x500 px or bigger canvas size. Any smaller size will make a brush look messy and shit.Here look:


Can you see the difference?? Lineart in 600x600 px is so much smoother
#2

#3

#4 RIGHT MOUSE BUTTON YOU NEED IT

#5
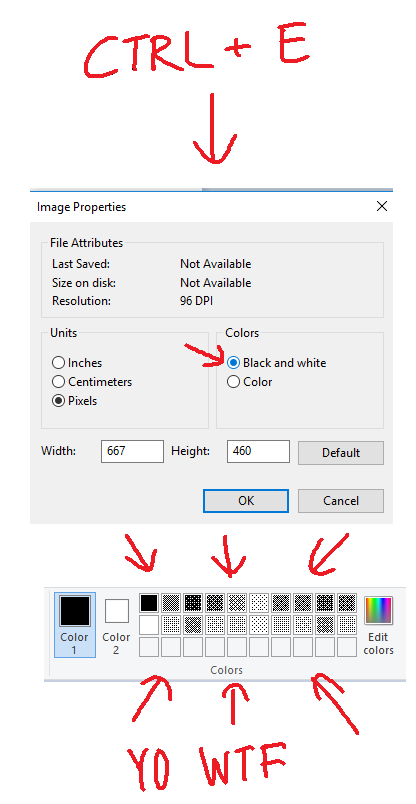

*:・゚✧it’s like manga : *✧・゚
that’s all tbh
i hope this was somewhat helpful

i am SO sorry for the super long response, but i thought this might make a nice little tutorial opportunity, since soft body physics can be… frustrating, to say the least. i’ve noticed that it tends to respond better to spherical meshes than most others, so getting it to work with something with a lot of hard edges and flat planes can be a little tricky (at least in my experience).
so! to get started, here’s my basic setup

the only thing i’ve done so far is place my object in the scene, along with a plane to act as the ground and a camera to record everything.
next you want to select your object, and in the properties menu on the right, select the physics tab (should be the very last one, the icon looks like a bouncing ball)

and for your object, you want to apply a collision and a soft body modifier (some people use rigid body instead of collision, so if you have issues with one there’s a chance the other might work out better. as for me, i usually stick to collision)

then select your plane and apply the collision modifier only.
now when you hit the play button at the bottom of the screen, this happens

it’ll just kinda float in place.
so to fix that, you select the object, go back into the physics menu, and look at its soft body settings

now uncheck the box that says “Soft Body Goal” (this’ll let gravity do its thing)

now when you press play after that

poor dude just kinda dies.
so there are a couple things i like to do to help it not… do… whatever that is.
go back into your object’s soft body menu and click on the tab that says “Soft Body Edges”

now underneath where it says “Collision:” you want to make sure that you have either “Edge” or “Face” (or both, why not live a little) applied to the object (this can help prevent clipping!)

we’re trying to make it wiggle n’ jiggle while still maintaining its shape, so what usually works for me is to crank up the “Bending” spring as high as it’ll go (which is 10) and enabling “Stiff Quads”

and we’re left with this!

and that’s how i do it! there are probably more efficient ways to get this effect, but for me

Jeez man, I really love the way you color. It's simple, yet everything is needed to know is there. How you do it
THANK YOU SO MUCH <3
Can't explain it all in words, so i made a tutorial. Hope it explains well xD


Quick art tip - child proportions
Ok this is a real quick one but let me show you how to get more-or-less accurate sizes for child characters. Kids are tricky to draw, they are - from toddler up to about teens people change radically almost every year so pinpointing character’s size during those years is pure hell.
What you need to do to make everything super easy for yourself is to check their Head Proportion. What makes kids look like - well, kids, is that their heads are proportionally large in comparison to their body.
Average adult is about 7,5 heads tall in comparison to their own body, however with children under 10 that number is just under 6 heads with about 1 head shorter the younger you go down to 3 heads as an infant.
Easiest way to figure the so-so head-height of a certain age is to find images of said age group and do a quick count on them

at which after you can replicate it in your own works - don’t mind if it’s not 1:1 with reference, finding images that are actually of the age you need is tricky and kids in general vary a lot so someone might be a lot taller than others. You have a bout 0,5 -1 heads of wiggle room before it starts to look way older.


Proportions are super important in art and i lovingly recommend everyone to figure out basics of them - it’s the easiest way to get notifically better with art. I could go on about proportions but let’s wrap this up. Need to note however that head proportion is not same as character height - a character can be 15 feet tall but still have head-height of 6, HH is simply a way to scale out the body.


I’m not really good at explaining or teaching things… so… Here you go. This is more like an example of how I draw noses, rather than how you need to draw them. I mean, it’s pretty basic, but maybe some artists have other ways to do it }: ? I hope it at least helps a little bit! (nothing fancy, but… yeah). sorry it took me so long to produce this half-assed thing }X D

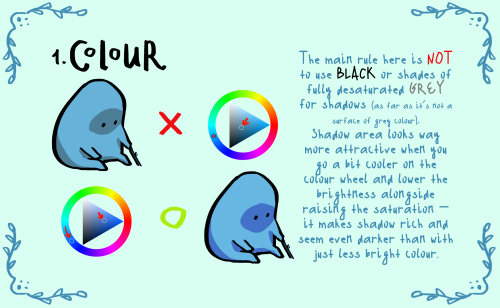

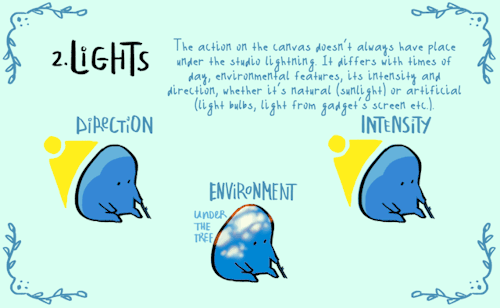

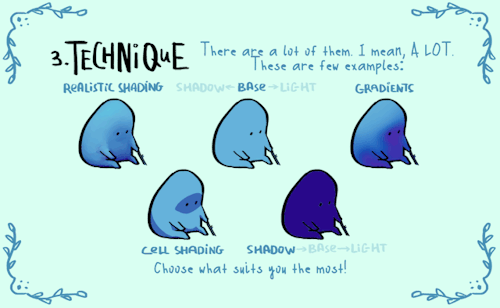

here comes small shading…tutorial? set of advises?? name it whatever you want. hope someone of y’all will find it at least a bit helpful!
special thanks to @cozy-capybara for literally inspiring me to make this thing
Slavic beliefs about treshold and hearth
The negative role of the treshold
“Together with the door, the threshold co-created a part of the border between the two fragments of space. It was placed in a point where the continuity of the boundary was breached. The importance of the threshold resulted from its dual nature: the separation of spaces and the chance to move between the two created areas. In symbolic thinking, the threshold could be identified (and metonymically replaced) with the critical points that occur when switching between two states of affairs (e.g. nature/culture, night/day) or personal statuses (e.g. childhood/adolescence, single/ married). Being a fraction of the boundary and the exponent of its crossing, the threshold had the characteristics of a border area, and therefore it was ontologically insecure. And so, because every crossing of the border was related to the risk of contacting the undifferentiated chaos of the underworld, or with touching the sacred, the threshold required special protection and the ritualistic behaviours.
The significance of the threshold in family rituals is quite clearly written in eth- nographic material. The threshold was one of the important elements of weddings or deaths, pregnant women were isolated from it. This boundary of the house did also need magical treatments. Apotropaic actions were also related to the thresholds of cowsheds and stables. The main motive of these activities was burying animals, coins, and/or unbaptized children underneath the threshold, or laying axes, garlic, brooms, knives, and/or herbs braided in a wreath on its surface.
Very few historical documents also describe the role of the threshold among Early Middle Ages Slavs. According to archaeological sources, its protective role (and, at the same time, protection over the whole house) can be confirmed by an auroch’s skull found in Gdańsk (circa 1230-1255), which was found near the south- eastern wall of a house, placed in parallel with it, in an alley between two hous- es; it could have been nailed to the top of the house as a hunting trophy. Wreaths made of twigs and hair could also fulfil an apotropaic function. A large number of wreaths made of phloem (9 pieces) was found during excavations in Gdańsk and Wolin. They were found on the streets, the square, and the vicinity of house walls in Early Middle Ages Gdańsk. Willow wreaths from Wolin were found near a wat- tle-and-daub house wall. In a nearby house some collections of wreaths placed on a corner peg were also found1. The wattle-and-daub buildings were built in the 11th and 12th centuries. They were 5 to 10 cm in diameter and were made of willow. A wicker wreath was in turn found in Szczecin inside a log cabin dating back to the first half of the 12th century. Identical wicker wreaths were present in Slavic buildings in Lund.
A possibly apotropaic meaning is connected with wreaths found in Gdańsk, Szczecin, and Wolin that were made of different materials, including horsehair. The incompleteness of archaeological material relating to the Early Middle Ages period does not allow to determine the exact role of this part of the house in apotropaic treatments. Deliberately omitted in this work is the ban on sweeping garbage over the threshold (the broom was treated as a cleanser), which is evident in ethnographic sources. According to Slavic beliefs the broom, when set on the threshold of a house or barn, defended the entrance against witches and protected from evil eyes.”
The symbolic role of the hearth
“The important part of the house was a place used for preparing meals and getting warm. According to ethnographic sources, the stove is a common component of beliefs and rituals. It was clearly a developed form of the hearth in the form of a fireplace and as such will continue to be considered, because fire was an inseparable companion of existence. Stanislaw Ciszewski assigned the following functions to the hearth:
1. it was a social environment and as such it merged individuals into a solidary group of people; 2. it was a symbol of life and existence; 3. it was a form of altar, and as such was an intermediary between a group of people and the spirits of their ancestors and the extrasensory world
The hearth discussed in this chapter has been treated in two ways: as a symbol of family life and spiritual life. The hearth constituted an integral part of life for a man and his family. It connected them to the extent that any important event was associated with it. In turn, the hearth manifested itself in spiritual life as the eternal worship of fire, seen as a god who must be adored. I am aware that this is an artificial division, but the clear application of it will help “organize” apotropaic magic activities connected with the cult of the hearth.
The fireplace or stove were a symbolic centre of family life, around which re- sided the guardian spirits of ancestors. Rituals associated with the hearth, which are the expression of a particular respect, have been observed in ethnographic material. The most archaic of them is the habit of “feeding” the fire, guardian spirits, clan, and family. These treatments are also confirmed by written sources, which speak about demons of destiny and a house spirit called uboże, which had to be taken care of by leaving food in right places. Also the available archaeological material of the Early Middle Ages allows to confirm the submission of different types of bloody and bloodless offerings near the stove and fireplaces.
Both atmospheric fire and the earthly one had sacred value, because the effect of contacting with them was the dissolution of all shapes, or, as a result, the liquidation of the opposition that characterized human oecumene: beginning-end, light-dark, right-left, and so on. This fire also had to be tamed by applying appropriate apotropaic treatments, which in this case took the form of prohibitions or commands with regard to handling fire. On the other hand fire, ashes, charcoal, or smoke were quite commonly believed to have purifying and protective powers. In the light of archaeological sources the worship of a deified fire within the house is probably the most difficult to detect. Over the centuries magical rites related to the worship of fire have changed. Perhaps the two vessels (from Wyszogród near War- saw and Radzim, Greater Poland Voivodeship) with special lightning-shaped and figural engravings on them were used during the protective magic rituals.”
Slavic protective magic in the Early Middle Ages on Polish territories by Joanna Wawrzeniuk

Custom brush tutorial kinda??
Heres how you can make pixel brushes in Clip Studio Paint
first make a little pixel pattern and made sure that the background layer is transparent.

then you want to select edit -> register material -> image. this i remember from trying it before

next name it and choose a place for it to go among the others. doesnt matter where really. also check the texture box.

next to make the brush choose whatever brush that youd like to give it that has the properties you want and copy it. i just chose the standard oil brush. go to the copied brushes settings and click texture

click where it says none and find the brush that you made. after you click it change the setting to this

for me the texture works for subtract, multiply and compare. dont really know the differences between them all or form the others but for what i wanted those three seemed to work.
i did this for a bunch of different pixel patterns and brushes and got some cool effects! check it out!

i appreciate all the help and suggestions yall gave me!

maybe once i figure them out some more i could offer stylized commissions with them :V
-
 secret-art-references reblogged this · 1 year ago
 -
 songsofdeath liked this · 2 years ago
 -
 thewormsheep reblogged this · 2 years ago
 -
 fillthelighter liked this · 3 years ago
 -
 parkerjones reblogged this · 3 years ago
 -
parkerjones liked this · 3 years ago
-
 nastysynth reblogged this · 3 years ago
 -
 cosmic-echoes liked this · 3 years ago
 -
 normanistyping liked this · 3 years ago
 -
 shadow-daughter reblogged this · 3 years ago
 -
 violet-amet reblogged this · 3 years ago
 -
violet-amet liked this · 3 years ago
-
 againtodreaming liked this · 3 years ago
 -
 witchlywonders434 liked this · 4 years ago
 -
 einherjarnir liked this · 4 years ago
 -
 kafkahibino-a reblogged this · 4 years ago
 -
 aautopsy liked this · 4 years ago
 -
 strawberryxginger reblogged this · 4 years ago
 -
 youregonnagofaar liked this · 4 years ago
 -
 rebloggypostee reblogged this · 4 years ago
 -
 tea-leafz liked this · 4 years ago
 -
 llemilkrice liked this · 4 years ago
 -
 andicalico liked this · 4 years ago
 -
 drawing-references-for-me-cuz reblogged this · 4 years ago
 -
 ghostprincessworld liked this · 4 years ago
 -
 adharawrites reblogged this · 4 years ago
 -
 cathyac liked this · 4 years ago
 -
 endlessfortless reblogged this · 4 years ago
 -
endlessfortless liked this · 4 years ago
-
 afoxholeofmuses reblogged this · 4 years ago
 -
 viridonia liked this · 4 years ago
 -
 rhythmr0gue liked this · 4 years ago
 -
 oatbuni-moved liked this · 4 years ago
 -
 bantatay reblogged this · 4 years ago
 -
 ashvdos reblogged this · 4 years ago
 -
 moosehorn reblogged this · 4 years ago
 -
 azianxpersuasionwrites reblogged this · 4 years ago
 -
 spvtfires liked this · 4 years ago
 -
 ofmozart liked this · 4 years ago
 -
 spellscarred liked this · 4 years ago
 -
 moonflowcr reblogged this · 4 years ago
 -
 venuscommissions liked this · 4 years ago
 -
 saltslug liked this · 4 years ago
 -
 nicolemaiines reblogged this · 4 years ago

Sylwester | i will mostly post sketches, because i'm too lazy to end them
196 posts