
bbirdbrain
hey hey hey im just a little guy
82 posts
Latest Posts by bbirdbrain
Here's some notes on some of the upper body muscles so you, artist, don't need to look them up


They are not medically accurate, just enough for artists to know the necessary muscles and how they work together
I 100% recommend doing the last exercise I did to be able to actually place the muscles
Here's some notes on some of the upper body muscles so you, artist, don't need to look them up
They are not medically accurate, just enough for artists to know the necessary muscles and how they work together
I 100% recommend doing the last exercise I did to be able to actually place the muscles

ethics of making AI images aside, I do find a bit amusing the kinds of sob stories and mental gymnastics people make up to pretend like drawing is this super technical skill with an impossibly high barrier of entry when its like one of the first hobbies toddlers pick up
suddenly a lot of people think they got the next Lord of the Rings in their head but they were never able to turn their stories into anything tangible because the evil elitist artists are hogging all the talent and skill and they need a bajilion years of training or something as if one of the most popular manga and anime of the past decade wasn't made by a guy that draws like this

Can't afford art school?
After seeing post like this 👇

And this gem 👇
As well as countless of others from the AI generator community. Just talking about how "inaccessible art" is, I decided why not show how wrong these guys are while also helping anyone who actually wants to learn.
Here is the first one ART TEACHERS! There are plenty online and in places like youtube.
📺Here is my list:
Proko (Free, mostly teaches anatomy and how to draw people. But does have art talks and teaches the basics.)
Marc Brunet (Free but he does have other classes for a cheap price. Use to work for Blizzard and teaches you everything)
Aaron Rutten (free, tips about art, talks about art programs and the best products for digital art)
BoroCG (free, teaches a verity of art mediums from 3D modeling to digital painting. As well as some tips that can be used across styles)
Jesse J. Jones (free, talks about animating)
Jesus Conde (free, teaches digital painting and has classes in Spanish)
Mohammed Agbadi (free, he gives some advice in some videos and talks about art)
Ross Draws (free, he does have other classes for a good price. Mostly teaching character designs and simple backgrounds.)
SamDoesArts (free, gives good advice and critiques)
Drawfee Show (free, they do give some good advice and great inspiration)
The Art of Aaron Blaise ( useful tips for digital art and animation. Was an animator for Disney. Mostly nature art)
Bobby Chiu ( useful tips and interviews with artist who are in the industry or making a living as artist)
Sinix Design (has some tips on drawing people)
Winged canvas (art school for free on a verity of mediums)
Bob Ross (just a good time, learn how to paint, as well as how too relax when doing art. "there are no mistakes only happy accidents", this channel also provides tips from another artist)
Scott Christian Sava (Inspiration and provides tips and advice)
Pikat (art advice and critiques)
Drawbox (a suggested cheap online art school, made of a community of artist)
Skillshare (A cheap learning site that has art classes ranging from traditional to digital. As well as Animation and tutorials on art programs. All under one price, in the USA it's around $34 a month)
Human anatomy for artist (not a video or teacher but the site is full of awesome refs to practice and get better at anatomy)
Second part BOOKS, I have collected some books that have helped me and might help others.
📚Here is my list:
The "how to draw manga" series produced by Graphic-sha. These are for manga artist but they give great advice and information.
"Creating characters with personality" by Tom Bancroft. A great book that can help not just people who draw cartoons but also realistic ones. As it helps you with facial ques and how to make a character interesting.
"Albinus on anatomy" by Robert Beverly Hale and Terence Coyle. Great book to help someone learn basic anatomy.
"Artistic Anatomy" by Dr. Paul Richer and Robert Beverly Hale. A good book if you want to go further in-depth with anatomy.
"Directing the story" by Francis Glebas. A good book if you want to Story board or make comics.
"Animal Anatomy for Artists" by Eliot Goldfinger. A good book for if you want to draw animals or creatures.
"Constructive Anatomy: with almost 500 illustrations" by George B. Bridgman. A great book to help you block out shadows in your figures and see them in a more 3 diamantine way.
"Dynamic Anatomy: Revised and expand" by Burne Hogarth. A book that shows how to block out shapes and easily understand what you are looking out. When it comes to human subjects.
"An Atlas of animal anatomy for artist" by W. Ellenberger and H. Dittrich and H. Baum. This is another good one for people who want to draw animals or creatures.
Etherington Brothers, they make books and have a free blog with art tips.
📝As for Supplies, I recommend starting out cheap, buying Pencils and art paper at dollar tree or 5 below. If you want to go fancy Michaels is always a good place for traditional supplies. They also get in some good sales and discounts. For digital art, I recommend not starting with a screen art drawing tablet as they are usually more expensive.
For the Best art Tablet I recommend either Xp-pen, Bamboo or Huion. Some can range from about 40$ to the thousands.
💻As for art programs here is a list of Free to pay.
Clip Studio paint ( you can choose to pay once or sub and get updates. Galaxy, Windows, macOS, iPad, iPhone, Android, or Chromebook device. )
Procreate ( pay once for $9.99 usd, IPAD & IPHONE ONLY)
Blender (for 3D modules/sculpting, animation and more. Free)
PaintTool SAI (pay but has a 31 day free trail)
Krita (Free)
mypaint (free)
FireAlpaca (free)
Aseprite ($19.99 usd but has a free trail, for pixel art Windows & macOS)
Drawpile (free and for if you want to draw with others)
IbisPaint (free, phone app ONLY)
Medibang (free, IPAD, Android and PC)
NOTE: Some of these can work on almost any computer like Clip and Sai but others will require a bit stronger computer like Blender. Please check their sites for if your computer is compatible.
So do with this information as you will but as you can tell there are ways to learn how to become an artist, without breaking the bank. The only thing that might be stopping YOU from using any of these things, is YOU.
I have made time to learn to draw and many artist have too. Either in-between working two jobs or taking care of your family and a job or regular school and chores. YOU just have to take the time or use some time management, it really doesn't take long to practice for like an hour or less. YOU also don't have to do it every day, just once or three times a week is fine.
Hope this was helpful and have a great day.
"also apologies for any spelling or grammar errors, I have Dyslexia and it makes my brain go XP when it comes to speech or writing"
Have this teeny tiny little guy I found today!


I think he's a Zebra Jumping Spider? (West Michigan) Was like a third the size of my pinky nail!
Teeny Man Time - WE MI, USA:
Ahhhhhhhhhh, yessssssss, YOU ARE CORRECT, this is definitely a Zebra Jumper (Salticus scenicus), family Salticidae.
Zebra spider - Wikipedia
Species Salticus scenicus - Zebra Jumper - BugGuide.Net
[about my own oc, who i created] in theory its possible she would say that, but we just dont know for sure
hot artists don't gatekeep
I've been resource gathering for YEARS so now I am going to share my dragons hoard
Floorplanner. Design and furnish a house for you to use for having a consistent background in your comic or anything! Free, you need an account, easy to use, and you can save multiple houses.
Comparing Heights. Input the heights of characters to see what the different is between them. Great for keeping consistency. Free.
Magma. Draw online with friends in real time. Great for practice or hanging out. Free, paid plan available, account preferred.
Smithsonian Open Access. Loads of free images. Free.
SketchDaily. Lots of pose references, massive library, is set on a timer so you can practice quick figure drawing. Free.
SculptGL. A sculpting tool which I am yet to master, but you should be able to make whatever 3d object you like with it. free.
Pexels. Free stock images. And the search engine is actually pretty good at pulling up what you want.
Figurosity. Great pose references, diverse body types, lots of "how to draw" videos directly on the site, the models are 3d and you can rotate the angle, but you can't make custom poses or edit body proportions. Free, account option, paid plans available.
Line of Action. More drawing references, this one also has a focus on expressions, hands/feet, animals, landscapes. Free.
Animal Photo. You pose a 3d skull model and select an animal species, and they give you a bunch of photo references for that animal at that angle. Super handy. Free.
Height Weight Chart. You ever see an OC listed as having a certain weight but then they look Wildly different than the number suggests? Well here's a site to avoid that! It shows real people at different weights and heights to give you a better idea of what these abstract numbers all look like. Free to use.


Art Hacks for Physical Disabilities!!
I know art can be inaccessible to physically disabled people for a lot of reasons, and I think art should be accessible to everyone, so here’s a couple of the things I found to help for a few different issues you may face that stop you participating!
I have a link to all these items (UK) in my link tree!!

IMAGE DESCRIPTION
Slide one: illustration of a white woman with pink hair, wearing a pink outfit, sitting in a power wheelchair, looking at the viewer with thumbs up. Text Reese “hacks to make art more accessible”
Slide two: illustration of three different kinds, using three different types of pencil grips. One hand uses a circular grip. 100 is a large, rectangular grip. Another uses a grip that is ergonomic and fit into the hand. Main text reads “Paul, grip, strength and dexterity”. Subtext reads “there are loads of different types of pencil, grips or design for different disabilities and conditions. Increasing the width of the pencil can give more texture for a better grip using a pencil with a thicker with also reduces the amounts of pressure needed to hold a pencil you can make your own using items like pool noodles. KT tape an air dry clay. You can also put these groups on things like paint brushes.“
Slide three: illustration of a hand using a tool that looks like a wrist support with a paintbrush connected to it text next to it reads “this talk next a paintbrush to your hand in a way that means you don’t need to hold the paintbrush with your fingers and you will need to move your arm around“ on the bottom right hand corner is in photograph of a guided hand device. Text read “regarded hand as a tool designed to reduce the need for moving your hands and fingers and relies on the movement of your shoulder and upper arms and can be used with different materials like paintbrushes, pencils, pens and styluses.
Slide four: main header reads “when in bed“. Illustration of an iPad pillow with a iPad in it is next to text that reads “iPad pillows, put your tablet at an easier to access level when sitting or lying down“. In the bottom left hand corner is an illustration of a girl sitting in bed in her pyjamas with a pillow behind her and a bed table as she is drawing. On the left hand side is a photograph of a bed table with the text reading “bed tables are used to give you a flat tire up surface while in bed, and are often height adjustable”. In the bottom right hand side is a bedsit, a pillow with the text underneath, reading “ bedsitters of specially shaped pillows that you put behind you in bed to help you set up and give you a soft surface to lean back on”.
Slide five: maisie had a read out “at a desk left”. On the left hand side is a photograph of the document holder with the text “document holders put your paper at an angle to help prevent crane in your neck down”. On the right hand, middle side is an illustration of someone using a armrest and on the bottom left hand side is a photograph of the armrest. Text next to them reads “economic arm rests clip onto your table or desk and give you a surface you lean you’re forearms or elbows on. This can be used to steady your arm and reduce pain and fatigue while sitting at a desk”.
Slide six: maisie reads “foot and mouth painters” . on the right hand side is an photograph of swapping Augustine, an Indian woman with no arms, wearing a sari painting with her left foot. In the bottom left hand corner is an illustration of a woman with green hair painting using her mouth. Text reads “foot and mouth painting is a technique used by artists who do not have, or cannot use their arms so hold the paintbrush in their mouth or using their foot. Swapna Augustine is a foot painter who has painted with her feet and participated in multiple exhibitions of foot and mouth painters. Her art is stunning and I would definitely recommend checking some of help work out.“
Slide seven: main text reeds “art without brushes and pens”. On the left-hand side is a photograph of a spin art device. Text next to read it reads “spin out involves using bottles of ink and squirting them onto a spinning piece of paper to create spiral art. On the middle right hand side is a illustration of a laptop with coding art written on the screen. Text me next to it reads “coding art involves making programs that design and create art pieces digitally. This could be used in conjunction with an eye tracking software.“ On the bottom left hand side is a photograph of a child in a power wheelchair with paint on their wheels painting onto a large piece of paper. Next to this is text reading “wheelchair painting involves putting paint on your wheelchair wheels and moving around and large piece of paper. Sometimes you can connect a roller to create more marks.“
Slide eight: text reads “what do you do to make art accessible for you?”
End of ID.


Manual Wheelchair Tutorial by Fade31415
So... I technically drew this 3 years ago but forgot to post it. I think I was going to clean up the end and make a nice recap, but I ran out of steam and then just left it as a wip for years. I got reminded of it because I was talking to a friend about how to draw wheelchairs today.
This covers most of what I view as the most common errors when it comes to drawing characters who use manual wheelchairs. I hope it helps you a lot.
Image description is in alt text, but there is a back up image description under the cut in case that does not work for some reason
[image description: a 4 picture long wheelchair tutorial. the background is white and the text, when it appears, is black and in calibri. each step will be labeled with "Step #" and a description of the drawing next to it, and "text" and then the text that is written to explain it to follow.
Step one text: So, you want to draw a character who uses a manual wheelchair? Awesome! I can't approve more. Drawing characters who use wheelchairs is a bit different than drawing standing characters, because of obvious posing differences. But to start, you need to know what parts of a wheelchair you will draw. So, without further ado, here are 3 wheelchairs!
Step one image: a simplified drawing of a chubby woman sitting in a quickie GPV manual wheelchair and resting her hand on the handrim of one of the wheels. this is labeled "the artist"
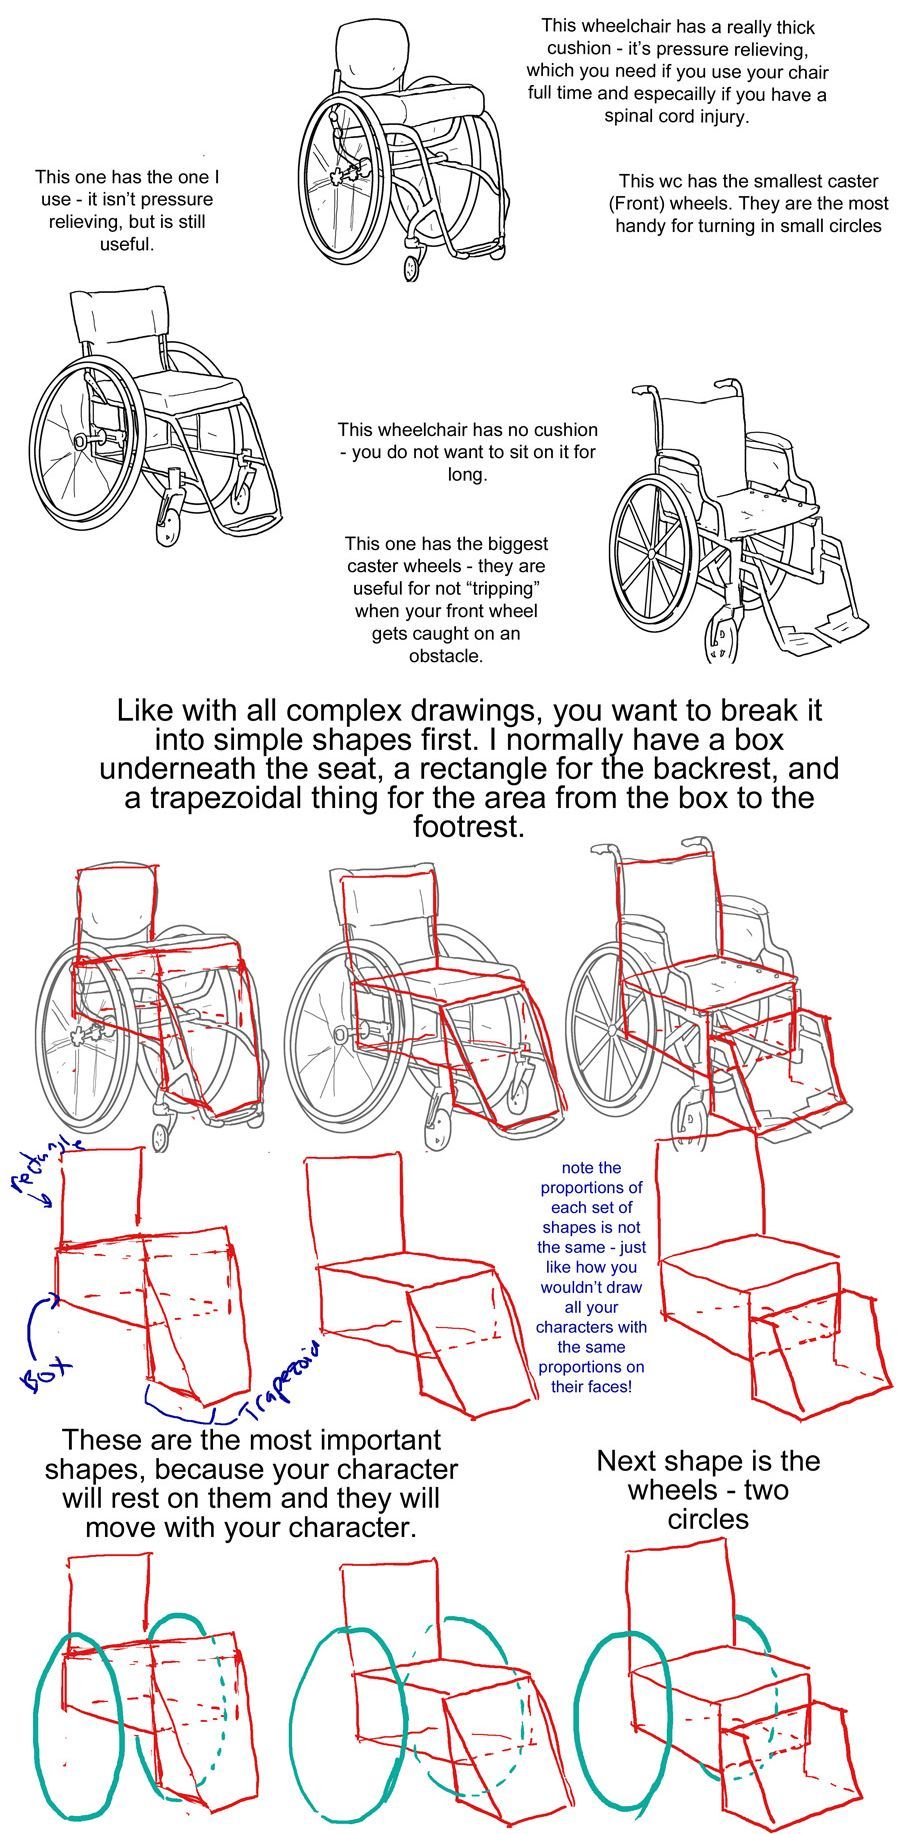
step two: next there is a lineart drawing of three wheelchairs. one is a tilite TR series 3. this is an ultralight wheelchair with a bucket seat (the back is lower than the front), a big cushion and a short backrest that kind of contours to the back of the person who would sit in it. the caster wheels (front wheels) are very small and the footrest is just two little metal bars. next image is a quickie GPV. this is also an ultralight wheelchair with a low back, but its caster wheels are slightly larger, the back has regular upholstery (it does not look like it was made to conform to the back of the person who sits there) and the frame is boxier -- there is no bar underneath the seat where the wheels would attach, rather each wheel is attached to the side of the chair. the next wheelchair is an invacare tracer. it is how most people imagine wheelchairs when they hear 'wheelchair'. it has no cushion and it has a high backrest with handles. it has high armrests that would be comfortable to rest your elbows on if you were just sitting. the wheels are not bicycle wheels like the previous two but are rather plastic. it has big footrests and big caster wheels.
text: the wheelchairs on the left are the ultralight, sporty kind. I have one of them (the quickie). the one on the right is a more standard one you might find in hospitals or as the public wheelchair in grocery stores or the mall.
step three: first is text to accompany the tilite. "This wheelchair has a really thick cushion - it's pressure relieving, which you need if you use your chair ufll tiem and especially if you have a spinal cord injury. This wc has the smallest caster (front) wheels. They are hte most handy for turning in small circles." next there is text to accompany the quickie gpv: "This one has the one I use -- it isn't pressure relieving, but is still useful." next is text to accompany the invacare: "this wheelchair has no cushion - you do not want to sit on it for long. This one has the biggest caster wheels - they are useful for not 'tripping' when your front wheel gets caught on an obstacle.”
step four text: like with all complex drawings, you want to break it into simple shapes first. I normally have a box underneath the seat, a rectangle for the backrest, and a trapezoidal thing for hte area from the box to the footrest. these are the most important shapes, because your character will rest on them and they will move with your character.
step four image: the lineart of each wheelchair has been put on reduced opacity, so we can see the square representing the backrest of each seat (the square is the smallest for the tilite and biggest for the invacare), the box for each seat and area underneath it, and the trapezoid for the footrests. the next step labels the images of these simplified shapes as the lineart is removed. "Note the proportions of each set of shapes is not the same - just like how you wouldn't draw all your characters with the same proportions on their faces!"
step 5: we see the same shapes to form the wheelchair, but now with blue circles drawn where the back wheels would be.
text: next shape is the wheels - two circles
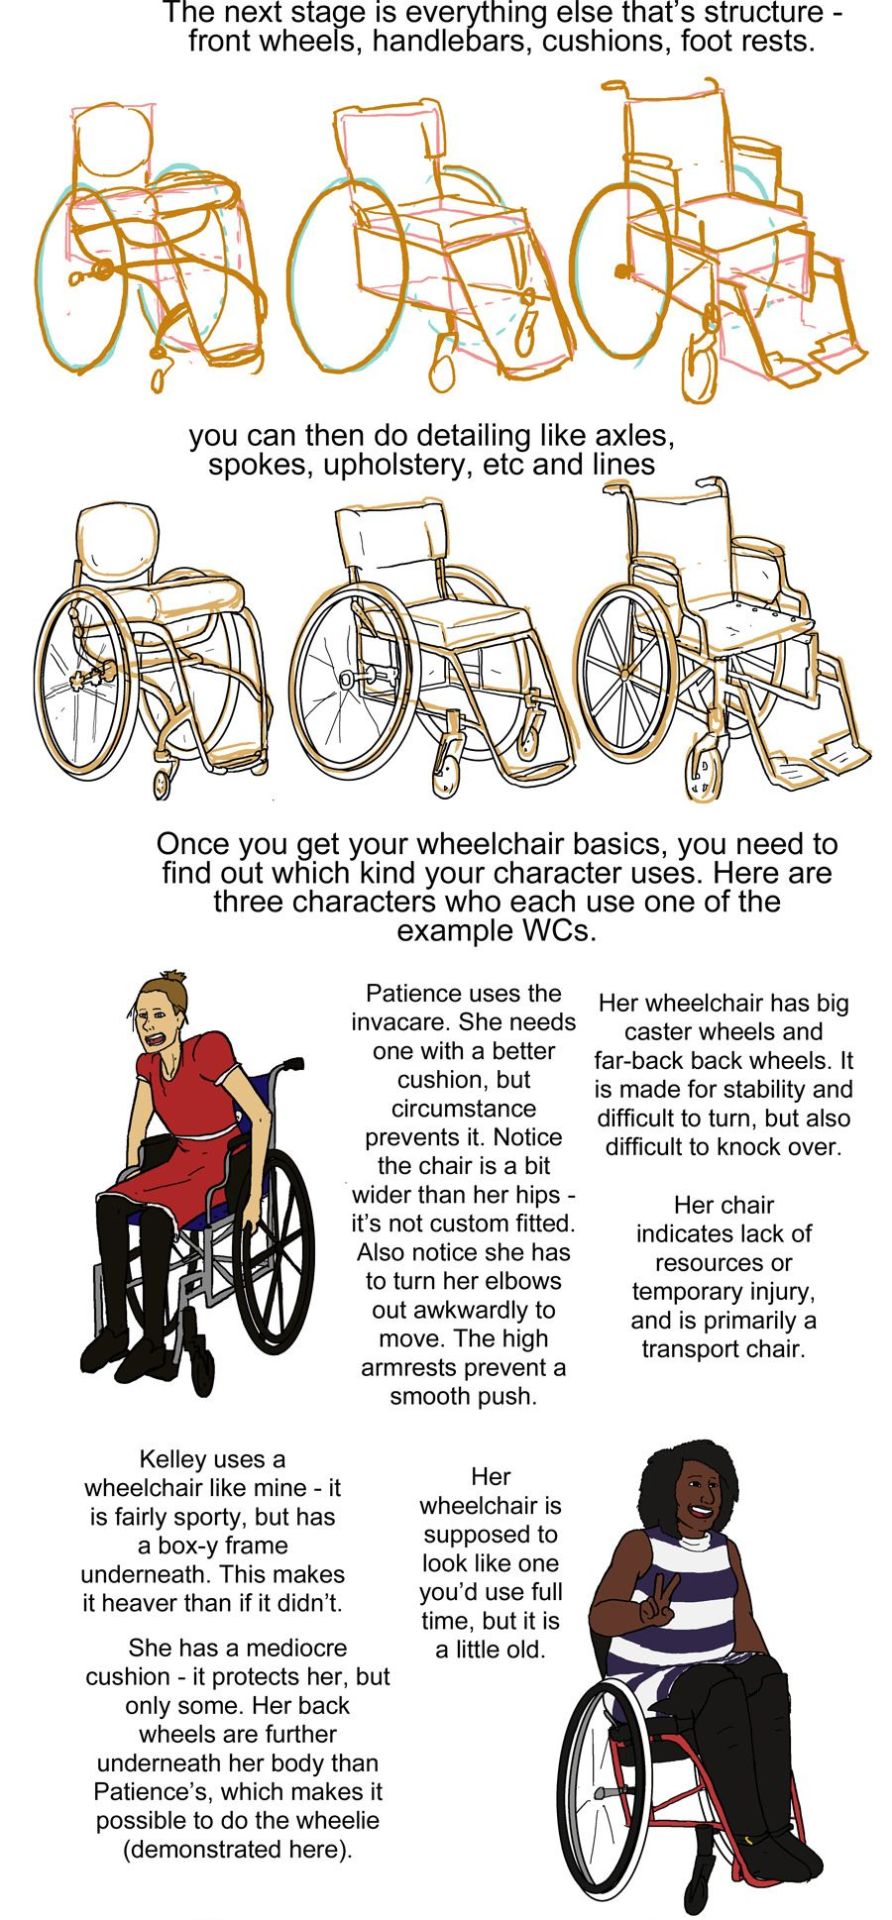
step six: next we see the wheels and shapes have been reduced in opacity and the basic structure of everything about each wheelchair: footrests, caster wheels, upholstery details, axles has been drawn on in orange.
text: the next stage is everything else that's structure - front wheels, handlebars, cushions, footrests.
Step seven: we see the lineart on top of the lowered opacity sketch.
text: you can then do detailing like axles, spokes, upholstery, etc and lines
step eight: next we see three drawings of different characters. there is patience, a skinny white woman sitting in a blue invacare wheelchair. kelley, a slightly chubby black woman wearing a stripey dress sitting in a red quickie gpv wheelchair and doing a wheelie while smiling. then luke, a white man with short blond hair wearing khaki pants. he is sitting in a tilite chair.
text: once you get your wheelchair basics, you need to find out which kind your character uses. here are three characters who each use one of the example WCs. patience uses the invacare. she needs one with a better cushion, but circumstance prevents it. Notice the chair is a bit wider than her hips - it's not custom fitted. Also notice she has to turn her elbows out awkwardly to move. the high armrests prevent a smooth push. her wheelchair has big caster wheels and far-back back wheels. it is made for stability and difficult to turn,but also difficult to knock over. Her chair indicates a lack of resources or temporary injury, and is primarily a transport chair
kelley uses a wheelchair like mine - it is fairly sporty, but has a box-y frame underneath. this makes it heaver than if it didn't.she has a mediocre cushion - it protects her, but only some. her back wheels are further underneath her body than Patience's, which makes it possible to do the wheelie (demonstrated here). her wheelchair is supposed to look line one you'd use full time, but it is a little old.
luke has a spinal cord injury. he has a very thick pressure relieving cushion for medical reasons. his chair is also ultralight, with no boxyness under the frame. his chair is the newest and lightest - it indicates his wealth/resources, but also that he needs to use on full time.
step nine: just a drawing of me sitting in my wheelchair holding my hands up to show fingerless wheelchair gloves. we're looking at me from above.
text: when you're choosing what wheelchair to give your character, think of both their disability and their resources and go from there. questions to ask yourself: is it made specifically for them or is it mass-produced or a hand-me-down (if it's custom, the seat will not be too wide or narrow in comparison to their body and their feet will rest on the footplate naturally). do they want more stability (further back back wheels, big caster wheels) or maneuverability (the inverse). do they need a pressure relieving cushion? how long are they using their wheelchair per day? how long have they needed a wheelchair? Do they have health insurance? do they have access to a lot of spending money? How much can they spend on their wheelchair? are they athletic etc etc
posing steps:
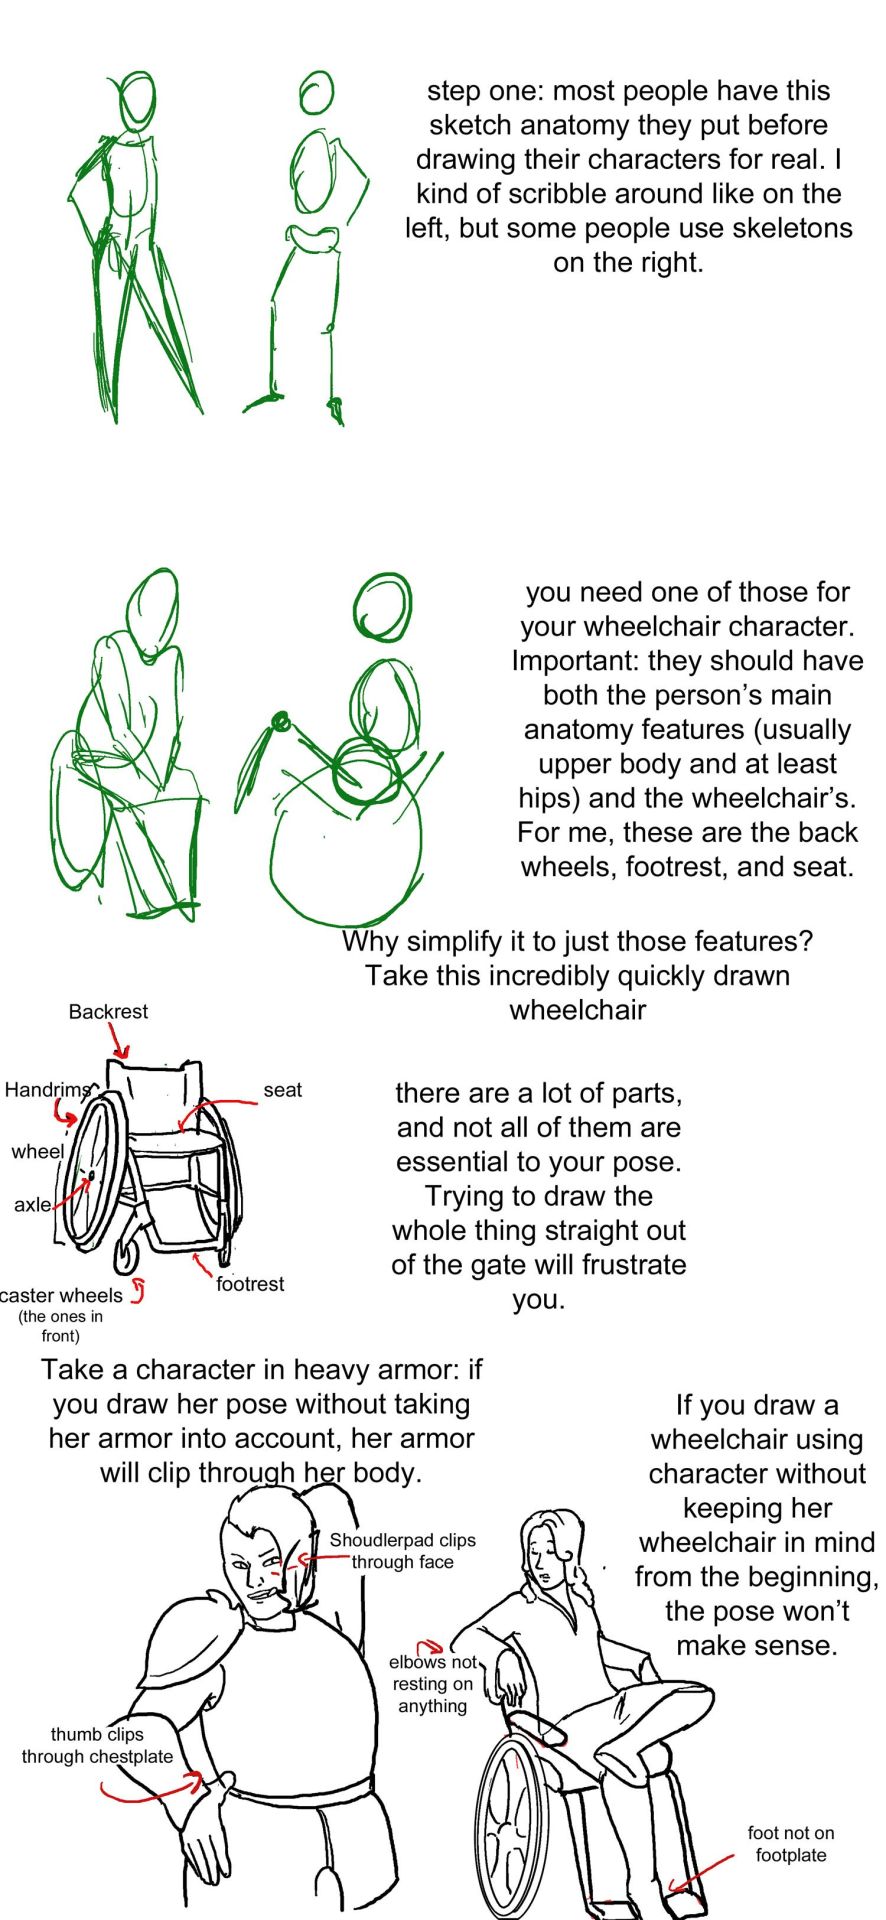
step one: a sketch of two people standing up. one just shows the outline of a person's body, with legs that are ind of triangle shaped, the other shows a sketched pelvis and rib cage to go along with the bones of the legs and arm. text: step one: Most people have this sketch anatomy they put before drawing their characters for real. I kind of scribble around like on the left, but some people use skeletons on the right.
step two: there are now too sketched pictures of people in wheelchairs. one shows lightly traced human form (arms articulated, curve for a stomach, legs that are kind of triangle shaped and pointing down) sitting in a wheelchair that is just the sketch of footrests and wheels. the other sketch shows the sketch of a body with a circle for hips and an oval for a rib cage and the person doing a wheelie (lifting the front end of the wheelchair off the ground and leaning back). their wheelchair is also sketched out and defined by a circle for their wheels and 2 lines, 1 of the seat and 1 for the backrest. text: you need one of those for your wheelchair character. important: they should have both the person's main anatomy features (Usually upper body and at least hips) and the wheelchair's. for me, these are the back wheels, footrest, and seat. why simplify to just those features? Take a look at this incredibly quickly drawn wheelchair.
step three: there is a lineart drawing of a manual wheelchair with slightly cambered (angled towards the seat) wheels, a backrest, and a footrest. the frame is light and there are no handlebars. there are labels pointing to different parts of the wheelchair: Backrest, handrims, wheel, axle, seat, footrest, and caster wheels (the ones in front). text: there are a lot of parts, and not all of them are essential to your pose. trying to draw the whole thing straight out of the gate will frustrate you.'
step four text: take a character in heavy armor: if you draw her pose without taking her armor into account, her armor will clip through her body. if you draw a wheelchair using character without keeping her wheelchair in mind from the beginning, the pose won't make sense.
step four image: next we see two lineart drawings of different characters. one is a bulky woman wearing plate armor. her hand is on her hip and she is trying to scratch her back with the other hand. there is the label "shoudlerpad clips through face" and "thumb clips through chestplate." the next drawing shows a woman in a wheelchair with one foot rested on her knee and her arms rested back, such that they would be rested on the back of a regular chair, but the back of her wheelchair is not wide enough for them to actually be resting on anything. the text here reads "elbows not resting on anything" and "foot not on footplate"
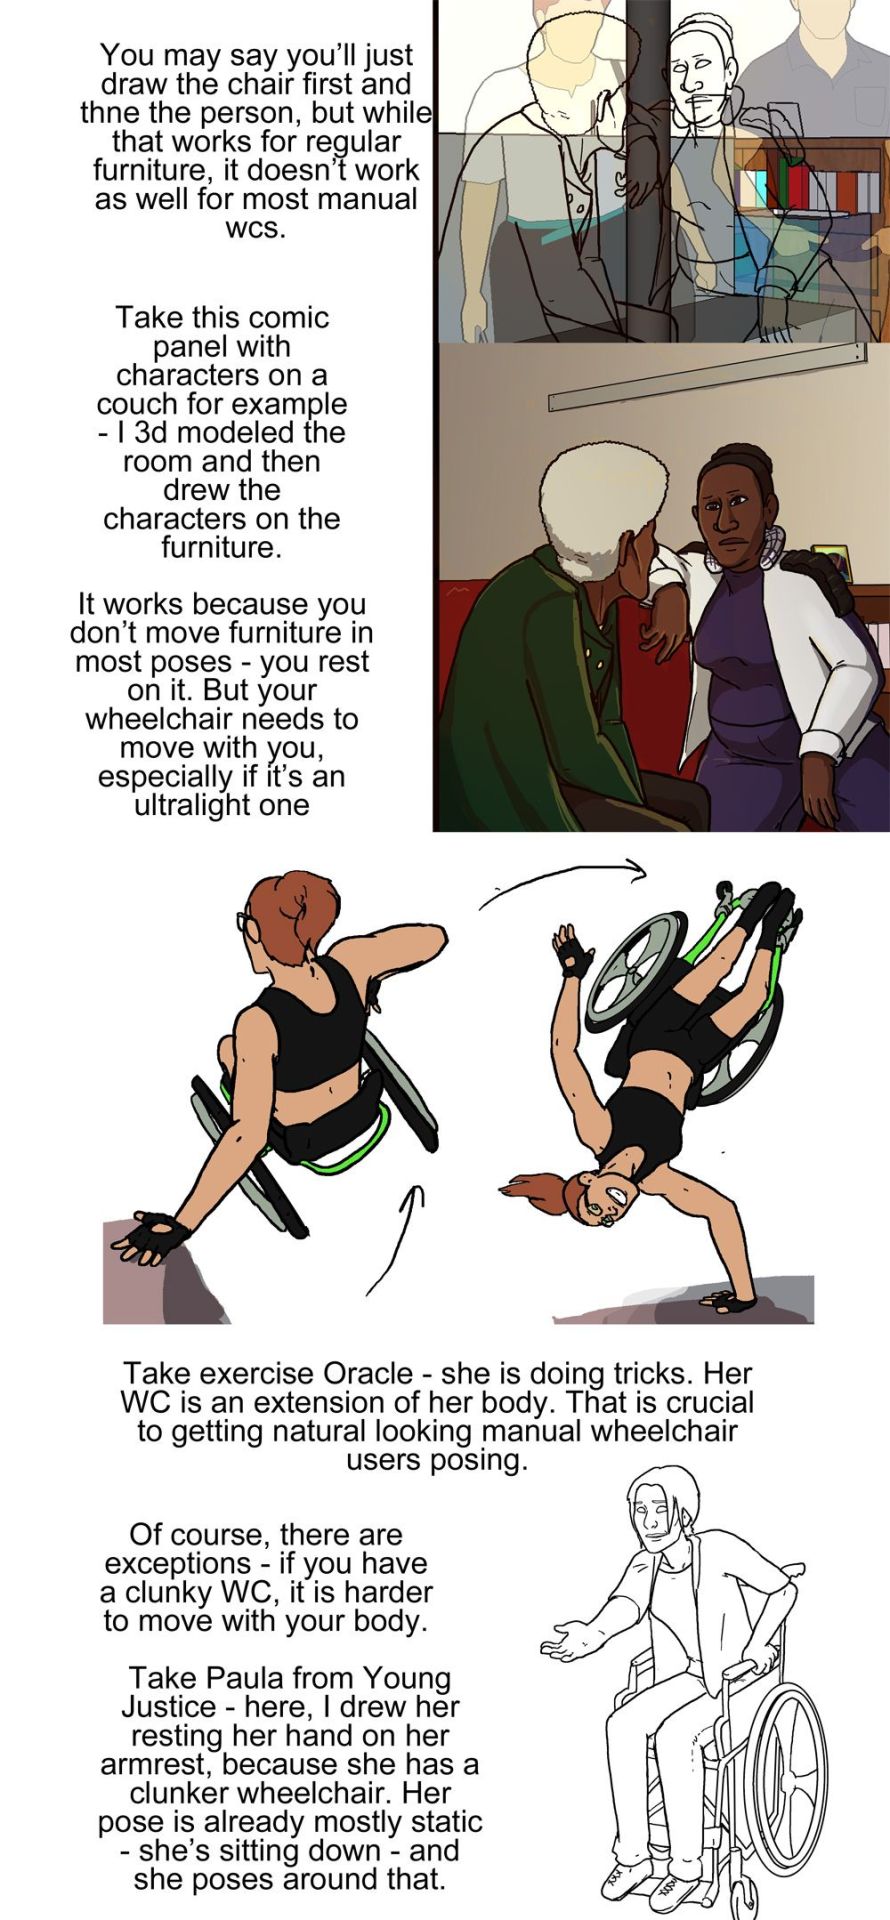
step five: there are two images, one is lineart on top of a 3d modelled apartment with sketchup, the other is a colored in version of that lineart with the background also colored in and no longer a 3d modelled screencap two characters, one old woman wearing a green jacket and one younger woman wearing a white shirt and blue undershirt, are sitting on a couch. the old woman is leaning forward and the young woman is resting her arm on the couch. behind the young woman is a bookshelf.
step five text: you may say you'll just draw the chair first and then the person, but while that works for regular furniture, it doesn't work as well for most manual wcs. take this comic panel with characters on a couch for example - I 3d modeled the room and then drew the characters on the furniture. it works because you don't move furniture in most poses - you rest on it. but your wheelchair needs to move with you, especially if it's an ultralight one.
step six image: there is a flat color drawing of barbara gordon in her wheelchair. she is wearing a black sportsbra and black shorts. in the first image we see she is doing tricks in her chair, zooming through the air (as if she has just launched herself off the ground in a skater park or somethign) while her left hand is resting on a structure and her right hand is heading towards the right handrim. the next image shows her right hand planted on the ground and her chair and body above her, such that she is briefly doing a one-handed handstand, but the motion line indicates that she is moving and this will not last. her left arm is near the handrim of her left wheel.
text: take exercise Oracle - she is doing tricks. Her WC is an extension of her body. That is crucial to getting natural looking manual wheelchair users after posing.
step seven: we see a lineart drawing of paula from young justice. she is sitting in a standard manual wheelchair with high armrests (goes up to the bottom of her ribs probably) and a high backrest (goes up to just below her shoulderblades). she is setting her hand on the armrest, leaning forward, and holding her other hand out.
text: of course, there are exceptions - if you have a clunky WC, it is harder to move with your body. Take Paula from young Justice - here, i drew her resting her hand on her armrest, because she has a clunker wheelchair. her pose is already mostly static - she's sitting down - and she poses around that.


‼️🇵🇸 An activist, who destroyed multiple engine parts of the jets Israel uses, has been released!
🔸 Source: pal_action

I drew some frogs! You can get them as stickers here too ☺️🫧
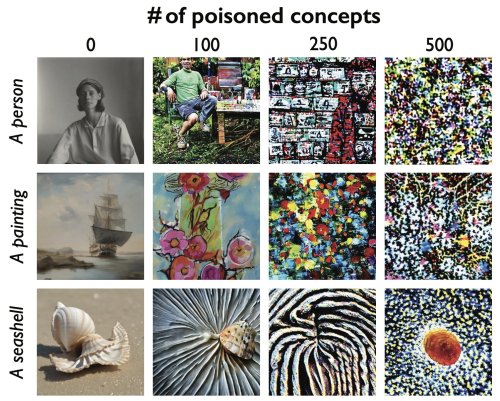
Good news, fellow artists! Nightshade has finally been released by the UChicago team! If you aren't aware of what Nightshade is, it's a tool that helps poison AI datasets so that the model "sees" something different from what an image actually depicts. It's the same team that released Glaze, which helps protect art against style mimicry (aka those finetuned models that try to rip off a specific artist). As they show in their paper, even a hundred poisoned concepts make a huge difference.

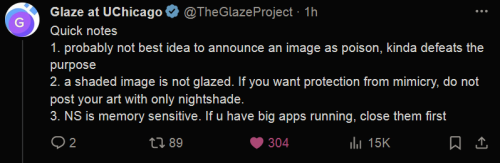

(Reminder that glazing your art is more important than nighshading it, as they mention in their tweets above, so when you're uploading your art, try to glaze it at the very least.)
HIIIIII PINNED POST TIME!!!

my name is fabian hello hiii!!! i draw cartoons!
this is specifically an art blog, my main is @chortlebot !!!
i don't currently take commissions, but i'll update this post if i start doing so!
my art is very focused on kidcore and rainbowcore as well as being anti-cringe culture :3 we have fun here 🌈 this blog is 100% sfw!
dni is under the cut

DNI:
general criteria (don't be homo/transphobic or racist. its 2024.)
people who post proship, pro para, or radqueer content, please don't interact with my artwork. this isn't a space for you, nor will it ever be.
please respect my boundaries.

take it.
i have a few resources i look to consistently but i'm gonna plug anatomy for sculptors as One Of The Most Useful. great if you're a 3D artist, INVALUABLE if you're a 2D artist. gives you turnarounds of specific limbs/fiddly body parts like ears. great especially if you're referencing a photo and start looking at an individual part like 'wait, what the hell is going on in there'


HEY THIS IS IMPORTANT whats your favorite place to find drawing references?


Sketch vs. Final
A look behind the scenes for this piece. I liked most aspects of the sketch (especially the pose for the character, the borzoi silhouettes, and the shadowy/messy look for the ouroboros), but did end up pushing the person's melancholy expression, the wispy tails, and the harsh pink/peach light on everything.


Art Fight batch #3 *MUFFLED SCREAMING*
Lads!! Trinket for @little-angelbun, Min for @bunbiiit, and Peaches for @bbirdbrain!
fuck consistency in art !!! we ballin !!!!!! whatever comes out of my hand next is up to god !!!!


ITS HERE!!
COMIC BASED OFF OF AN IDEA BY @sprucewoodmpreg AS WELL AS @boiling-paint ’S ADDITION TO SAID POST


sometimes you gotta post all your art at once when you remember you exist


heres a kenny

ok @ artists i want to know if i’m in the minority here
how do draw good
fill 14 sketch book
bad stuff is good stuff bc you made stuff
do you like sparkle???? draw sparkle
draw what make your heart do the smiley emote
member to drink lotsa agua or else bad time
d ont stress friend all is well
your art is hot like potato crisps
don’t let anyone piss on your good mood amigo
if they do
eat
them